Decoupage dances are one of the varieties of this technique, and the most popular. Just guess how many souvenirs, gifts and decorative items were collected during the special dance. Perhaps you can begin to get acquainted with this unique type of handicraft by making decoupage dances with your own hands.
How to make decoupage dances with your own hands
Decoupage dances sound much more scary, but it’s true. Just a little patience and you will end up with an original hand-cut piece.
First, let's look at the basic principles of how to create decoupage on a dance, and then let's get down to practice. Aja can't get anywhere without practice. And if you still don’t have enough information, we recommend that you familiarize yourself with the basics of decoupage, there are different types of needlework, so you can choose something to your liking.
And so let's turn to how to work decoupage on the dance, as well as what methods and how to consolidate them.
What is needed for decoupage dancing
All the necessary materials for everything are already in your home. Well, if you want to make some money, you’ll have to visit the handicraft store that you have in your locality. Need:
- Sklyana or porcelain dance(bazhana without small parts and relief surface)
- Baby on paper(servettes, little ones or scraps from a book or magazine, pictures from the Internet, decoupage cards)
- Rozchinnik(For surface cleaning)
- Acrylic farb
- PVA glue
- Varnish(acrylic varnish for fixing pictures on the dance or craquelure varnish if you want to create a decoupage of dances for old times)
- Dodatkovo may be needed (pencils, sponges, sponges, containers for farb, etc.)
Decoupage of dances with servettes
This may be the most advanced type of technology. I recommend that you start decoupaging dances with servettes with your own hands, so that you can learn about the process and materials for the work. It’s even easier to go from legion to fold, gaining enough knowledge.
Yak robiti decoupage dances with servettes
The name speaks for itself. As a basis, we will use the original table set with baby food and absolutely no matter what it will be. Let's go! Zrobimo our first decoupage of dances with servettes one by one.
Lesson 1: preparation. Select a dance (don’t forget, it is without writing or relief elements). For the cob, you need to remove the label and stickers. Why soak them in warm, light water. After an hour, pass through a metal mesh to remove any excess glue.
Lesson 2: Priming the base. Znezhiriti surface vikoristuyuchi rozchinnik. Then, using a sponge, apply acrylic paste as a base.

If you have a clear view of the dance and you appreciate that the little ones on it look “healthy” and without a background, then skip this entire chapter.

The color of the farbee should be chosen to be lighter or darker in tone, so that it does not clash with the background and the decoupage on the servettes looks contrasting. Apply a bunch of farby balls to give the background a relief and a deep color.
![]()
Lesson 3: preparing the baby. Choose a table set with baby food that you like. The server is made up of two balls: the top one is a picture and the bottom one is a paper. Once you have finished with the top ball, carefully fold it into the bottom one.


Krok 4: secret. Tsey Croc is not obov'yakovy. If you want to get rid of the effect, like tiny daubing on the dance, you need to glue a picture of a server on a paper and apply a small amount of varnish on top of the motif. Let the dates dry, and then place them in water until the papier is wet. Rub the wet papier with your hands and remove it. In this way, you will end up with only a few little ones on the varnished surface.

This cake is brown for those who know how to create decoupage from serverets on the dance floor, but do not know all the subtleties of this technique.
Lesson 5: drawing pictures. On the previously primed surface we place the dried baby like a serverette. Then we coat this animal with PVA glue. Carefully move the paper bulbs around the paper and flatten the picture so that there are no folds. I let the glue dry.

To this point you need to go with special care so as not to tear or zip the picture. The first time, not yet knowing how to do decoupage from servets on a dance, I made more than one dance. It’s easier to learn from other people’s favors, so I’ll write a lesson on decoupage dances made from servettes.

Step 6: applying varnish. The picture is already on the dance floor, but it is necessary to protect it in the face of the rising wind, and such a situation will not be preserved for long.
Apply acrylic varnish in small portions to the surface of the dance and smear it with penzlik. It is necessary to thoroughly coat the surface. It is much easier to apply to the animal from the bottom up. For complete protection, you need to apply Trichy varnish.


At this lesson I used clear acrylic varnish. You can also create a decoupage of dances with your own hands using craquelure to give the appearance of the old look. This varnish creates the effect of cracks due to old age.

At whose butt we looked at the decoupage of the cursed dance. There are also other types of techniques from frozen dances. Let's talk about them, and you already know how to make decoupage of curse dances with your own hands.
How to make decoupage of a plastic dance
This type of technology is very similar, but has one peculiarity. First printed on the bottom, the surface of the object must be carefully prepared. And “sand” the surface of the plastic with fine sandpaper, so that it becomes rough and sticks to the paint.
Pokkovy decoupage of plastic dance
- Vidality label
- Znezhirity
- Sand the emery paper afterward and degrease again
- Mix with acrylic paste (a few times)
- Glue the motif and the date to dry
- Apply acrylic varnish (a bunch of balls)


Essentially, this is the same decoupage of plastic dances with servettes, but with the preliminary preparation of plastic.
Decoupage of dances for cobs
For those who want to master this type of handicraft, I would recommend decoupage for cob servers on the dance floor. In my opinion, this is the simplest and most accessible way to try something new. More detailed descriptions of decoupage dances for cobs, step by step, and difficulties are not to blame. And we can safely recommend it to beginners, because there is no harm in buying a dance, and spending on amenities is very minimal.

I also want to give the newbies an idea. It’s not easy to create servettes or decoupage cards. The Vikorist printer can be printed on a paper with a photograph and produced decoupage from photography on the dance floor. It will look cool if you give your friends a soda pop with your photo on it. So go ahead, now you know why to start decoupaging the dance with a photograph. This could also be a wonderful gift for National Day or Merry Day. With this method you can get a unique gift of champagne.

Now you know what is needed to decoupage a dance for cobs. So go ahead, take everything that’s worth it decoupage«!
Decoupage dances design ideas
A selection of ready-made robots has been collected from this section. It’s possible that some kind of help will be needed to help you see your work. We have selected the best ideas for decoupage dances, so that you know what you can get.

New items in decoupage dances
The handicraft tradition does not stand still but develops. At the same time, data often appears butts that are enemies. The axis deals with them.


From this article we learned the basics of technology, and also developed decoupage and embellishment of dances. Practice and create masterpieces.
People of all ages are engaged in creativity. An important theme is decoupage for cobs. Pokrokovo from the photo of the dance you can start working your first virib. Once you try it, you can easily decorate a wicker cat, any piece of furniture, or renew an old lamp.
The advantage of this technique is that it can be sealed on different surfaces. Decoupage brings back the old technique. This decor is especially popular when creating objects in a vintage style. Original solutions include the use of retro accessories in the interior design.
The original interior is unique in its original decor
How to make decoupage dances for cobs: step by step with photos and detailed instructions
An extraordinary technique of mastery is decoupage of dances with tights. The master class transfers the creation of volumetric forms. This results in an imitation of richly embossed ridges.

Decoupage comes in various types:
- a direct method in which babies stick to the front part of an object;
- The gate is stuck together for decoration on the surface of the glass, in this case the picture is glued in the middle;
- The technique is of the volumetric type, if the babies hang above another surface;
- the dim method is an option for artistic painting;
- Decopatch is a method where the object is pasted over with pieces of cut material: from servets, or from a plain colored one.
Corrisna information! The advantage of the singing technique lies in the style of decoration of the space, as well as in the design of the room. For decoupage you can use any pictures, newspaper clippings, bright magazines and labels. Also available are servettes, textured paper and special cards for decoupage.
You can start decorative decoupage for cobs from a photo of the dance and the preparation of singing elements and materials. You will need some kind of plaster with a smooth surface, acrylic paste, glue, varnish, scissors and alcohol cutting. For decoration, you can use ornaments on servets, newspaper photographs or scraps from websites.
| Image | Stage works |
|---|---|
| Remove all paper stickers. For this purpose, place the dishes in a million compartment, and then remove all the items from it with an emery paper. Then the surface is wiped with a repairman. |
| To create a beautiful baby, prime the surface. Farba can be applied with a sponge and pen. For a rich color, apply a bunch of balls. |
| The image can be viewed from the server. For this part with the viewer, you need to separate the paper. When you paint a newspaper clip, the paper is covered with a few balls of varnish, dipped in warm water, and then the varnished piece is cured with wet paper and glued to the dance. |
| To paste the image, apply a sealer on the dry surface of the dance and cover it with varnish. |
| The baby grows stronger with additional varnish. |
 | Fill the virib for drying. |


Meister class decoupage furniture in Provence style
Provence style is often found in original ideas for do-it-yourself decoupage of kitchen furniture. Photos of current solutions can be found on the website. If you have saved old pieces of furniture from your grandmother’s time, then with the help of this technique you can give them a new life.

The interior of the Provence style exudes extraordinary beauty. To decorate a room in a similar style, you don’t need to spend a lot of pennies; you can create a stylish one with your own hands using available materials. To decorate furniture in this style, there are motifs characteristic of the French province. These are flower gardens, fields of lavender, Malovniki streets and vineyard plantations.
How to create a masterpiece in the Provence style, you can marvel at our master class on the butt of the chest of drawers.
| Image | Description of the action |
|---|---|
 | Prepare a chest of drawers, beautiful ornaments on serverets, farbe, glue, a roller, a pencil, sandpaper and scissors. |
 | The furniture itself is prepared by the furniture. Apply the balls with a roller, and after drying, sand the short spots with an emery paper. |
 | While the chest of drawers is drying, you can remove the serving elements for decoration. |
 | The glue is placed behind the place where the image is placed and behind the images themselves. To reduce the effect of abrasions, apply sandpaper. |
 | The surface is coated with varnish. It is necessary to apply 10 to 15 balls. |
 | It is recommended to polish the leather fourth ball with a varnish. |
 | The farmhouse is climbing. |
 | When finished, you need to scratch until the chest of drawers is dry. |
How to create decoupage on paper from servers: instructions with photos
You can quickly use this technique to decoupage from serverets on a glass. For this you need to prepare warehouses, something to prepare, themed cutlets, varnish, glue and pencils. Select the following message: Capacity. The surface must be treated with alcohol.
| Image | Robot |
|---|---|
| It is necessary to sink the surface using the chosen method: using a tarpaulin, a primer or sticking with rice paper. |
| The serverets provide beautiful decorative elements. |
| To prepare the paper, the paper is placed on the surface using paper pencils and coated with glue. After drying, the little ones are coated with varnish. |
 | You can circle the little ones behind an additional contour for the warehouse to produce other parts. |


Corrisna information! If you want to apply decoupage to dishes that are used for eating, then use special glue for storing porcelain. The finished product needs to be dried and then baked in the oven.
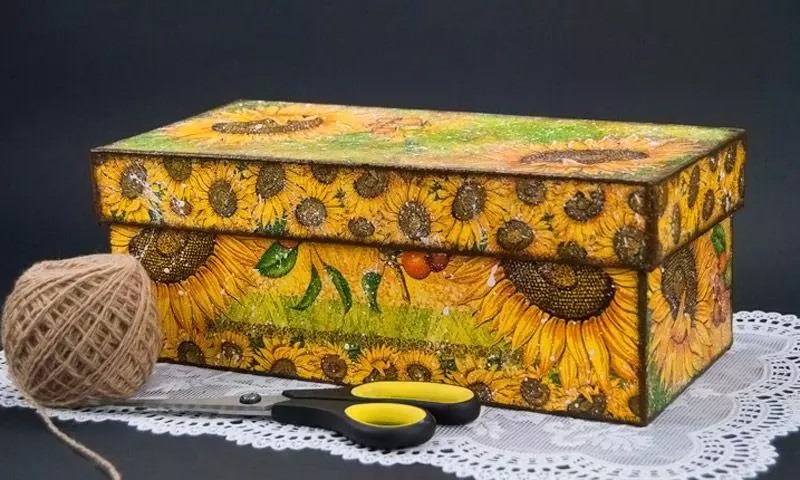
Decoupage on boxes
Varto try to repeat the simple master class decoupage of the box from the bottom. For the material you will need a thick box, cutlery, acrylic sheets, glue and brushes.
| Image | Etapi roboti |
|---|---|
| Apply a white color coat to the box, then dry thoroughly. |
| We can view images from servers. In this case, the upper ball is reinforced. Glue is applied to the part so that it sticks to the box. |
| The glue is applied from the middle to the edges with slight pressure. |
| After the image has dried, you can decorate the surface using decorative stamps. |
| To achieve an aged look, you need to go through a dark tarpaulin along the edges. |
| The top of the baby is secured with acrylic varnish. |
| This is how it looks after the new robot. |


How to glue correctly without creases?
It is necessary to familiarize yourself with certain rules before creating decoupage for the cobs. Pokrokovo from photos of dances and servets you can create unique compositions. The servettes are especially foldable. All types of servers cannot be glued using a wet method, otherwise the stinking fragments will immediately arise. To glue it evenly and without wrinkles, you can quickly hot-heat it. PVA glue is applied to the surface. Then, after drying, the serverette is applied to this area and smoothed with hot sand through a papier. In this case, the servette will be glued without folds. On a serving board glued in a similar way, you need to carefully apply varnish, especially the first ball.
Kitchen design ideas
There are obviously a lot of ideas for decorating a kitchen using decoupage techniques. Varto try these options:

Decoupage can be embellished with gilding, toning, the effect of antique pieces and the craquelure technique. To decorate a kitchen, the following style is chosen: Shabby chic and country. For decoration, you can choose different gastronomic motifs: berries, cupcakes, cakes and fruits.
Ideas for decorating your kitchen:


To create a unique interior, you need to spend a lot of money. Using the tools at hand, you can create wonderful accessories and pieces of furniture for any design idea.
Stattya
If, after the holy day, you can’t throw out a dance to the fact that the shape of the judge is even bigger, it means that the seemingly beautiful thing could prove to your mind that you already have an idea for decoration.
Your soul requires a creative act - decorating dances with your own hands.
Before your services, you will always find a master class at the master’s partnership or an Internet version of the work process. Ideas for decoration can be found on the forums, where handicrafts can be shared in profits. A simple way to decorate is decoupage from a photo. After processing, a picture, photograph or leaflet is pasted onto the dance. It is based on a personal technique and a master of class, where the decor of the dances consists of twine, sequins, hides, stitches and covered with tights.
![]()
Farbuyemo dance
In order to get a taste for decorating, do simple manipulations with the object. Elementary decoration of glass containers with your own hands and fumbling for additional farbi. The insightful object can be prepared in the middle.
For internal coating, pour acrylic mixture into the dough using a syringe without a head and turn the dough to achieve a thick internal coating.

How can you create density in the middle of a bunch of colors? For whose skin the color ball is not guilty of distorting the entire surface, even just a part. The colorful decor of the dance adds to the mood of the interior.

Call for a dance to start with the help of sponges and brushes. Spray the dishes with alcohol first and apply the acrylic coating thoroughly. To the white acrylic paste, add a small amount of toners or vikorist gouache - mixed color toners with a white base, remove the required shades and create a color decor for the splash.

Farbovana dance - the basis for decoration
You can quickly decorate a tsika-shaped dance with your own hands using stitches and stitches. Make a small bow from a stitch, sew it on a basic base, add a brooch, and then place it on the neck of the vessel - an exclusive item for the decoration of your home!

The bright and sparkling effect can be achieved with available materials, for example, I say. Cover the prepared dance from the outer side with glue and seal it with large crystals, carefully place it on a flat surface until completely dry. Decorate with a decorative object for a winter interior or a themed one for the New River.
If the salty ball looks boring, you will need to decorate the sill on a bunch of pieces, then apply glue to only those places where it is necessary to squeeze and seal the sill. A master class on this topic will provide assistance in mastered techniques.

Once again about the decor
By simply making a dance with your own hands, you can achieve a unique effect of silver or golden gloss, which shimmers with the fires of a new Kazan, a carnival or vintage treasures sprinkled with sparkles.

In order to achieve a stylish effect of gold sawing on a future art object, it must be prepared. Preparing the glass for further decoration with your own hands at the cob stage is the same for any method of preparation: wash the object, dry it, deflate it and treat it with a universal primer.

The prepared glass container can be prepared. What's the use of car spray in a can? Dust the traces at a distance of 15 cm from the object, in the open air or on the balcony.
If there is no spray can, add gold/honeycomb acrylic powder to household goods stores. To apply, use a foam sponge. Apply the traces with point (tampon) rukhs, leaving traces on the surface, and not smudge, the surface will come out smooth, without separation.
Gold, like wood, comes in colors, that is. There are a bunch of pods to work with these swilling farms.

You can add decor to the decor in a number of ways. For example, wrap one part of the container in hemp tape, securing it with a glue gun. Or wrap it in parts with a motuzka, colored threads, or namist. Glue on the hearts or stitches. Decorating dances is a lot of fun, and you can also use all the materials at hand for a leather idea.

Decoupage of dances with servettes (meister class)
The required technique for decorating dances is decoupage. Take a master class with decoupage and you will appreciate the technique again.
Clumsy manipulations with servettes, decoupage cards or divided pictures allow you to create a charming decorative item of exclusive design.

The simplest way to decorate an object is to paste a cut-out picture. To get a taste of manual work, take a master class on technology and discover ideas. Prepare the container, as it is said above, choose a subject that suits you (from a leaflet, magazine, decoupage card), draw it and stick it on the surface. Add accessories, brooches, spray, stitches, glue them with your own hands using a glue gun. Some of this is enough.

The decoration of dances with a more fundamental approach requires preparation, the master class is always before the river. For the technique, in the classic version, a colorful ball of serving is used. If a three-ball server requires only a ball of baby, the class of the server is also important - there will be a bright baby.
For work you need:
- decoration object;
- universal soil;
- acrylic farba white and color;
- toneri chi art gouache;
- acrylic varnish (artistic or everyday);
- brushes, sponge for tamponing;
- Servetka with baby fish.

Stages of work for the master class:
- Prepare the container (wrinkle it, lighten it, prime it).

- Paint the dance to be decorated with white acrylic and two balls using the tampon method using a sponge. Dry after skin application.

- Using manicure scissors, use manicure scissors to cut the little ones or cut along the contour. If the little ones are on a white aphid, you can follow the outline, the white part of the serverlet will match the background on the object.

- A white color is not always suitable for your idea, so you can apply any other color on a white surface. If you are new to decoupage, use a light, creamy color to give it a color. With dark ashes, additional robots are needed for servers. Dry the surface.
![]()
- Place the baby with a barvy ball on top and apply acrylic glue (you can use acrylic varnish) on top of it with a pencil, be careful not to allow creases or bulbs. Act carefully and carefully. Dry.

- Once all the little pieces have been glued, you can proceed to the remaining decoration. The decoupage of the dances is completed by applying three balls of varnish and drying. It is necessary to sand the surface with fine sandpaper and cover it with a final ball of varnish. The decoration of the dances with a hand is completed!

Not less decoupage
Having mastered a simple decoupage of dances with servettes, you will always want more. The smooth surface of the dance does not provide texture, which is the only way to achieve a better effect. You can create a tsikava surface with tights or panchokh for help. Master class of this type of decor can be found on the Internet.

To do this, take one part of a pair of tights, soak it with mixed PVA glue and water (proportion 1 to 1) and press it onto the pantyhose. Add some texture, some kind of texture.
Instead of tights, you can use decoupage fabric, using similar procedures for materials and techniques.
![]()
Fill the bowl with equal parts to glue the serverette. Let the surface dry, prime with a special compound or acrylic paint. Now you can create a decoupage of dances, dances, embed your ideas and leave them out.

Another way to trim the texture: wrap the dance with threads of the same color threads for sewing various items. Colored thread decor also works well with selected bauble yarn for knitting.
By alternately using vikorist threads in a ribbed color, you can create a very stylish decorative item by securing the threads with PVA glue. Decorate the dances with twine, varnish with varto threads and vikorize them like a vase, or you can prime, coat and stick on the serverets.

Skin for decoration
Decorating dresses with skins is one of the most beautiful opportunities to utilize excess skins or jackets, freebies and take away an interior item for decorating a booth. You can decorate it with skin if I smear the surface. For the robot, you need “Moment” type glue, tweezers, scissors and a knife, as well as imagination.

To create folds, scrape the skin and the required meat. The reporting master class can be found at the Global Merezha. Spread the flap and strip of skin with glue, apply the skin to the surface and form folds.
With the skin, the pieces are folded, the bottom is used to decoupage the dances with fabric, and the folds are also formed directly on the dance.

The molded decor needs to be left to dry for a while and then be additionally coated, gilded, and other elements added - everything needs to be left in place for the idea.
The treasury box is designed to hold coins; for the gift wine container, there is a beautifully carved strong cork, which is also lined with skin.

Don’t throw away the empty dances, with the help of your hands you will create a unique art object for your booth. And it doesn’t matter what the decoration of the dances will be using the technique of decoupage, leatherwork or fabrication, uniqueness and creativity are the most important in the decoration.
Video gallery
In addition to the techniques discussed in this article, clear images are applied to decorative decorations of the interior and functional words. The main advantage here is not so much the cost savings as the ability to create unique viruses with your own hands. It will be easier to identify talents if you carefully read the decoupage for the beginning of the day, with photos of the dance, descriptions of tools and materials. This article suggests how to help implement technology in home minds without compromising.
It's not the skin of a person that makes an artist's skills. You can also use ready-made pictures on paper noses. If you transfer them to a different basis and protect them from unpleasant external influxes, you will get the desired result.
Similar techniques have been used in almost hundreds of cases. Nowadays, the only tools available are expensive materials. It’s no longer difficult to find a similar illustration in a magazine, or create a unique picture from the printer’s waste. Or the most handy ones are servers, or other ready-made printing viruses with little ones that repeat. They are used to decorate, for example, a number of tables at the table.
There are different types of decoupage:
- Classic - it is drawn along the contour of the pictures, their fixation on the surface and the application of clear varnish to the surface.
- The “return” technique paints dry characteristics. Here the baby is secured with its front side on the slope to avoid injury.
- 3D images look real. To do this, glue shells and other objects to create a relief for the molded mouth.
List of equipment and medical equipment. Once you have mastered the skills, you will learn them all at once, in different combinations.

Below is the standard technique of decoupage from serverets:
- The surface is cleaned to remove any dirt and defatted.
- They are prepared evenly with one color, and the ball is hung up.
- At this hour I’ll prepare the dough. The little ones from the servette are carefully cut along the contour.
- Having lowered it into the water, reinforce the ball with the picture. Drain yogo.
- Apply adhesive to the base. Apply it on top and prepare it. Bulbs and unevenness are visible. Cover the top with glue.
- After the first break, create a bunch of balls from varnish.
Important! As soon as the great wind has taken place, it will be pierced at the center. Irregularities appear in ruffles from the edges to the middle.
Preparation
First of all, you need to specify the following points:
- This technology is suitable for curing various materials. Ale under the hour of work with the song project maistri will ensure the peculiarities of the basis. From the tree, for example, with a “zero” emery paper you can see the smallest fibers.
- To make it easier, you can add a special set. At the trading network you can find special cards in different styles, sets for plates and other types.
- Switch off when new powder appears in the process. To apply farb and other technological warehouses, use vicoristic pencils. Proven hair products give preference to natural hair.
- For a complex of durable properties, it is better to use adhesives and fabrics, varnishes and acrylic-based primers.

Important! It’s easier for a beginner to understand the nuances of technology by adding cards for decoupage on a larger paper.
Additional technologies
Current professional techniques are used to achieve special aesthetic parameters:

Decoupage is considered to be in the middle between Hand-made and mystical. The word decoupage came to us from French and literally means “to embellish,” and in essence is a different type of appliqué. It is based on the technique of gluing various little ones on paper, serverets, fabrics on a hard surface. Decoupage is actively inspired by the decorative mystique, techniques are actively developing, and the range of materials and objects that are used for decorating is expanding.
The use of this technology is becoming widespread all the time, and more and more people will become interested in this type of creativity and contribute their own ideas. At the moment, there are a lot of schools, both on the Internet and others, who are engaged in activities and tasks.
Decoupage dances photo
During the period when decoupage became popular in Russia, it was one of the first objects that literally all the masters began to decorate—dances with wine and champagne. Particular respect was given to dances with a non-standard shape and volumetric texture. They were not tossed out, but recreated to suit the interior decor.
To decoupage dances, you can use various materials and techniques - serverets, putty, decorative elements, or everything that came to hand.


What is needed for decoupage, list for starters
As has already been said above, decoupage has a rich variety of techniques, with which smells are actively developing - new materials, techniques and techniques are appearing.
But still, here are the main directions that we give:
Classic decoupage - gluing serving dishes, decoupage cards, rice paper onto a flat hard surface;

Artistic decoupage evolves from the classic one, so that artistic techniques, underpainting, underpainting, antiquity and others are added to the main image;

Gate decoupage - gluing a picture onto the surface of a clear base;

Volumetric decoupage - when decorating vicor, various volumetric pastes, putty and decorative elements are used.

In order to practice in the traditional techniques, a set of materials is required - different for the specific skin condition, and also the necessary set, which is responsible for the appearance of any master-cob:
Servettes, rice papier, decoupage card- necessary storage facilities for any type of equipment, the basis of any composition. You can buy these materials now from any craft store, office supply store or on the Internet. You can choose the original tableware, as you will find a fruitful image with a similar plot.

Emery paper- Always in the arsenal for polishing surfaces, as a rule, there is a splint of grainy types - medium and fine, as well as the stages of polishing sprat.

Alcohol But even if there is alcohol mixed with it as a medium for defatting the surface, you can also use it as a medium for removing varnish.

Primer– a special acrylic material that is applied as a base under decoupage for garnish on the surface.

Acrylic fabric– In decoupage, only acrylic materials are used, which is why they are quick to dry and easy to apply. In the arsenal there is a greater variety of colors, which is why they are often used for underpainting.

Glue for decoupage- As a rule, it is acrylic, but the most commonly used glue is PVA glue.

Acrylic varnish- There are many different types of acrylic varnish - matte, glossy and chameleon. Most handicrafts use high-viscosity, high-viscosity acrylic varnish, but for master-cobs, it is recommended to use vicoristic professional varnish for decoupage.

Brushes– the most resistant to decoupage are synthetic pencils, especially flat ones. Sizes can be different, so they are used for different purposes.

Stationery file– in such cases, vikorist is used for gluing the server.
Knifes– vikorystvuyutsya when virizuvannі image, richly maistrin vikoristuyutsya manicures.
Roller- You can use a small roller to smooth out the pasted image.

Stack– this is an artistic tool that is very well suited for mixing farb.

What kind of varnish is needed for decoupage
One of the most important materials is decoupage varnish, from which the hidden result often lies. As a rule, varnish is applied lightly to secure the image. So the very sweetness and varnish flows into the final appearance.

Varnishes are divided into several types according to stock and purpose (decorative and finishing).
Acrylic varnish- The most popular, it is non-toxic, odorless and non-flammable, and it is water-based. Because of this, your warehouse quickly dries and does not dry out over time.
Acrylic varnish Use it not only as a final one, but also as an intermediate one - to secure the ball. The intermediate varnish was painted as the basis for the underlying decor.
Due to its wide range of capabilities, there is a line of varnishes with decorative effects behind the warehouse.
In order to be fully equipped, make sure that your master has several types of varnish - basic acrylic (matte and glossy) and finishing.
What kind of glue is needed for decoupage
For decoupage, it is important to use acrylic glue. Art stores sell special glue for decoupage, but it is sold in small jars and can be expensive.

Most brands that specialize in the production of products for applied arts use their lines and glue. Moreover, most professional experts actively use PVA glue of various brands.

Since you are better off using professional glue, but since you are unable to add glue in an art store, we know about the most important characteristics of the glue, which are necessary for it to be able to use it in the workplace. bathing robots:
- Carelessness when hanging;
- Medium consistency;
- It’s not Shvidko’s fault;
- It is not my fault to wait with the hour;
- I am not guilty of my mother's smell.
Decoupage of dances with servettes pokrokovo, Meister Klass
If you have a duty to categorize your interior, it is necessary to decorate the original dance. It can be used as a decorative interior item, or as a vase.

To decorate the dance with servettes you will need:
- Sklyana dance.
- Decoupage servette or card, go like a rice papier, baby can be whatever.
- Alcohol, a burner or a saucepan for skimming the surface.
- Acrylic farb.
- Decoupage glue chi PVA glue.
- Acrylic varnish.
- Penzliks, sponges (you can use a dish sponge), knives.
The dough for cob needs to be prepared - clean the labels and skim the surface.


Before gluing the servettes, the ashes are crushed with acrylic tarpaulin. The color of the background should be done according to the best judgment, so that you can match the baby on the serveret. Dilute the farb for the background with water, so that the wines look like serpanoks. For relief, make a bunch of balls. Leave the place under the baby unfarmed.

You need to pick up the little ones from the servettes, but you can pick them up with your hands. Strengthen the bottom two balls of the serving dish.

On the surface that was lost under the little ones, we apply a serving cloth and coat the beast with a ball of glue. Make sure to push out the buns and carefully straighten out the folds. Let the glue dry. Handle carefully, the fragments of the serverette are very thin and can easily tear.

Now you need to secure the baby, for which you need to cover the dance with a thin ball of acrylic varnish.

After that, as soon as the first ball of varnish dries, you can apply the old dance. To do this, dilute the black or other dark farb with water and use an old toothbrush to make a scrub. It’s better to practice on an unnecessary surface first. It is necessary to take care that when cutting, the farb can fly to all sides, so it is better to work on the pelvis or the cerebrum so as not to mess everything up.

After the farb has dried, apply two more balls of varnish.

As a result of unnecessary dancing, we were deprived of a valuable interior item.
Decoupage dances with tights with your own hands, step by step.
Volumetric decoupage- One of the most popular techniques, for its implementation, various auxiliary materials are used for construction. Texture is achieved through decorative fabrication with contrasting colors.
We represent the master class, in which the original women's tights act as material for work.
Vikory materials:
- A cursed dance with a cap that will spin.
- PVA glue.
- Nylon tights.
- Glue thermo gun.
- Peas.

Wear panchokha under your tights.

Fill a deep container with glue and let it soak.

Place on the top and form a drapery, let it dry.

For a droplet, use a metal cap. Place a small piece of glue on the lid using a piece of panchokha. Connect the ends and screw them onto the top of the lid. Bend the edge of the lid to create a droplet shape and let it dry.

From the pantyhose part of the tights, cut the stitching.

Collect skin tissue on a thread.

Form three-pieces.

Apply glue to the thirds and then place them to dry.

Glue the dried three-pieces onto the cloth and onto the dance.

Glue the cap like a dance to the bottom of the drop.

Glue decorative elements to the front of the earrings.

Apply the finished composition to the aerosol paste, the brown top, and then the golden paste, then coat the parts that appear with the golden paste.

Decoupage of dances with paper Meister Klass
Another available material for decorating dances using the decoupage technique is toilet papier. With this help you can create any volumetric elements.
You will need:
- Sklyana dance.
- The recipe for low-fat is alcohol, alcohol and so on.
- PVA glue whatever.
- Foam sponge.
- Office clamp.
- Synthetic brush.
- Sponge with large pores.
- Toilet papier.
- Servetki.
- Acrylic fabric.
- Acrylic varnish.
Clean the dough from the labels and skim with alcohol or a serving bowl.

Prime the surface with white tarpaulin or a special primer; do not tar the neck yet. Let it dry.

Apply the serverette to the top and cover with glue, use a pencil to carefully smooth out all the folds from the center to the edges.

Gently coat the part of the dance that is missing with glue.

Texturedly place pieces of toilet paper onto the glue-coated surface. Cover the dance and dry it.


After the paper has dried thoroughly, cover the entire surface of the dance with varnish.

Paint the dance with a color that is similar to the color of the server.

Draw a picture, it’s necessary there.

Moisten a dry sponge on the surface, press firmly and go over the swollen areas to add additional volume.

Carefully dry the dance again and coat it with varnish, maybe two times.


The original decorative dance is ready.

Decoupage of dances with egg scallop Meister Klass
Decoupage with an egg scarl ultimately results in a similar craquelure effect - an old one for the additional imitation of cracks in the fabric. The difference is that the surface becomes more prominent.

The advantage is that the material being used is not expensive artistic material, but basic scrap paper.
Another plus is that behind the help of scarlating we can use various pieces of wood on a decorated surface, for example, whenever.
For the rich, you can get food - what you can do first is stick on a scarf or stick on a servette. In principle, there is no particular difference, follow the situation. Once you have already glued the serverette onto the head, first start gluing the scaralaupe on the bottom - cover the little ones with varnish, so that if you start gluing, there is a high probability of glue getting on the serveret - it won’t get wet.
Start the work by covering a small piece of the surface with glue and, as shown on the small piece, glue the scarf pieces. Weed out small plots.
Below are detailed photographs.


Decorating with an egg scarf also helps to capture various inscriptions and often vikorist ones for decorating dances. If you already have an idea of how the dance or object will be decorated, you can start by gluing the scarlet, rather than doing the decoupage first, then sticking the scarl.
After covering all the surfaces behind the plan, let it dry. At this point you can drink for a long time, otherwise you will lose patience.

Decoupage dances up to 23 fierce
With a great number of options for gifts for people up to 23 years old, a dance is decorated, melodiously, one of the most winning ones. You can also leave the packaging for a riddle instead of vikorystuvat.
We present a number of ideas for the decoration of the dance with the symbolism of the saint.


Decoupage dances up to 8 bereznya


Decoupage dances with fabric and mere living Meister Klass
Decoupage from various textile materials - fabrics, mesh - gives a wonderful decorative result. The relief turns out to be voluminous and not transferable. With additional help, you can give the effect of antiquity and antiquity.

Decoupage with wicker fabrics and try for an analogy with the decor from tights. The material oozes glue and is placed on the flap looking like drapery. Marvel at what miraculous results can be achieved.
No less beautiful dances are performed at the vikoristan measure.
We present a master class with decoupage dances.

You will need:
- Sklyana dance.
- A medium for defatting the surface.
- Servetka or decoupage cards.
- Acrylic primer.
- Acrylic fabric.
- Merezhivo.
- White contour.
- Brushes.
- PVA glue.
Using compact hands, apply primer to the surface of the dough, defatting it first. To dry, a ball of acrylic paint can be applied on top of the primer.


Glue the hemstitch with PVA glue.

Place additional decorative elements and stick them as well.

Cover the mesh with acrylic tarpaulin.

Using an acrylic outline, you need to apply specks on the base and on the neck of the patch.

Paint the upper part of the dance in a uniform color.

You can use some white powder to mute the color, as it is not bright enough.

Place the top ball of the serving bowl with the baby, twist the picture with your hands along the edges of the image.

Glue the picture onto the dance using a brush and glue, apply the glue on top of the picture.

You can also stick a picture on the gate, or you can do it yourself.

In order to combine the images, create underpainting.

To consolidate the result, the dance can be coated with acrylic varnish at the top of the balls.


Decoupage of merry dances
Decoupage is widely used in the preparation of merry accessories, including merry dances and celebrations.


Decoupage champagne dance
When we go to visit friends and show respect or simply sputter like a present with a whole splash of champagne, try decorating it yourself.


Material for decoupage from Aliexpress
Materials for decoupage can be purchased freely, and in many stores. There are a large number of specialized sellers on the Internet - buy in one place any materials - from farb to mold. However, prices are still high today.
Many confirmed buyers have long loved the online store. This is a Chinese store, which has on its resource a great number of Chinese producers.
Servetki
 /category/202001947/rhinestones.html?spm=a2g0v.search0302.109.10.3d5f76fbdxFa27&g=y
https://ua.aliexpress.com/wholesale?catId=0&initiative_id=SB_20180506034116&SearchText=%D0%BA%D0%B8%D1%81%D1%82%D0%B8+%D0%B4%D0%BB%D1%8F+ %D1%80%D0%B8%D1%81%D0%BE%D0%B2%D0%B0%D0%BD%D0%B8%D1%8F
Recently, the technique of direct and reverse decoupage has gained particular popularity among handicraft lovers. This essence lies in the tiny pieces glued in a special way on the various surfaces of paper, skin, fabric or wood. For additional decoupage, the masters try to avoid garnishes, original products that can decorate the interior of a booth or become a gift. How to master this technique? It’s easy to create decoupage dances with Meister Klass tights to aim lower. Try this technology and you will experience a lot of positive emotions!
Rules for decorating dances using the decoupage technique
Your children will be captured if you allow them to take part in the creation of unique viruses with your own hands. These receptions will be lost in the memory of the little ones and will bring you both a lot of joy. Various materials are suitable for viruses: fabric, tights, scallops, sea turtles, toilet papier, cutlery, mesh, photographs, etc.
And to prepare the surface, fix and give the necessary shape and background to the decoupage elements, glue, primer, oil, farbee, varnish will help. Using this technology, you can decorate a bowl of champagne, wine, cognac, martin, a plastic or clay pot for drinks, a vase, or a jar. If you are planning to first develop a new technique to avoid any problems, become familiar with the many rules of decoupage.
Decorative flowers produced using this technology are expected to be as contrasting and vibrant as possible. It is important to choose a plain surface for gluing the babies and decorate them with brightly colored elements. To create an original decoration for the interior, go for a dance. When preparing this virus, follow these recommendations:
- For decoupage, take a simple shape, because non-standard ones will be difficult to process.
- When the serverlets are picked out in decoupage, their heads are cut into little ones, and then the top ball is reinforced and then glued.
- To glue fragments to the surface, it is better to use decoupage glue. However, instead of using the new method, use PVA, diluted with water.
- Glue the little ones onto the surface of the object coated with glue and flatten them to remove folds.
- When the dance is dry using this technique, it is opened with a special varnish for decoupage.
- After finishing, the work is done, with a basil, covered with acrylic paint, decorated with stitches, nastinki, turtles, sparkles, bows.
Pokrokovi master class with decoupage dances with nylon tights
Before the cob begins to decoupage, prepare the dough. To do this, soak in warm water and then clean off stickers, debris, and excess glue. I'll ask Vimita to use some alcohol to lighten the surface. This stage must be carefully worked out, so that the balls that are placed on the slope will not be trimmed for long. Then paint the acrylic varnish. We cover the surface and elements of the dance.
DIY decoration of the champagne dance “Lady in the Capelus”
It’s easy to make the interior of your apartment original with the help of unique, stylish decor. Do-it-yourself preparations at the booth look especially effective, resulting in the accumulation of family members and guests. To create your own decoupage of dances with tights according to the master class “Lady in Capelus”, you will need the following tools and materials:
- a dance behind champagne, a cap in front of her;
- PVA glue;
- tights;
- knives;
- glue "Titan";
- canning lid;
- peas;
- aerosol farba brown golden color.
Technology for preparing virob:
- Cut out panchokha tights.
- Cover the nylon parts with PVA glue.
- The clothes are prepared in step 2 panchokha in a container at the bottom and up.
- Create a garne of draping on tights, coated with elasticity, which is embellished, and dried.
- Take a lid for canning. Place a small piece of panchokha on it, soaking it with glue, and tie the ends of the nylon fabric on the top of the wrapped element.
- Bend the edges of the drop-top and dry it.
- From the excess panchokha, cut 6 slices, pick up the skin from one side using another thread from the neck and form three-pieces, soak them with glue, and dry.
- Once all the prepared elements have dried, you need to glue the “little flowers” onto the droplet and the middle of the dance with “Titanium”.
- On the upper part of the glass container, as well as on the neck of the cloth, stick peas in the shape of an earring, namist.
- Glue a champagne cap onto the lower part of the “droplet”.
- All elements, visible parts of the dance, are coated with brown and then golden powder.
Decoration of the Christmas dance with the help of tights and servets
If you show your imagination and master the technique of decoupage, then unnecessary words can easily turn into sophisticated and unusually elegant decor. So, the original dance and nylon tights, serverets can be easily transformed into an exclusive stylish decoration for the table, interior, an elegant, cheerful, new arrival gift, a present for the fathers for the birth of a child or a young man. To create decoupage, follow the instructions below. For this preparation you will need the following items:
- Sklyan dance;
- PVA glue;
- nylon tights;
- acrylic farb;
- servettes with a flowered flower top or at least a living motif;
- farba-watercolor or spray can with farboy.

Instructions step by step:
- Clean and spray the surface of the dance with alcohol.
- Let the panchohi soak in glue.
- Place the panchokha from the bottom onto the glass surface and give the material a relief, turn the top edge of the fabric out for a voluminous look on the neck, and at the end, where the picture is glued, create a ribbed one.
- Dry it thoroughly and cover it with acrylic tarpaulin. Dry.
- Cut the serverets according to the stencil of the little ones, waterproof the top ball and glue it to the surface of the glass. Visushiti.
- Apply an aerosol spray onto the top of the glass container, along with the part with the picture. Visushiti.
- Decorate the dance with decor (blizzards, beads, rhinestones).
How to create decoupage on dances with tights with folds
I can decorate the dance beautifully, if I curse the dance easily, using the same type of decoupage technique. For whom are nylon tights suitable? This material, soaked in glue, miraculously drapes on the glass container. How to give the shape to the nylon, lie in the ideas and fantasies of the handicraft. The surface is decorated with this material and prepared in any color. Decoupage of dances with tights according to Meister Klass, described below, will help you transform the original glass containers for decoration. For this, the preparation needs.
Decoupage is a fun and difficult activity that has a lot of techniques and is accessible to even the youngest craftsmen. With this help you can prepare exclusive interior items that will decorate not only your home, but also the exhibition halls of art galleries. Within the framework of this we will look around, as a viconati with your own handsdecoupage for cobs Pokrokovo with photo. It’s hard to get over something that won’t work out; in reality, everything is even simpler. With the help of this technology, your home will find a new life for old furniture, dishes, and many other things.
Virobi with decoupage - a vitvori of mystique
Let's take a look at the implications first. Decoupage means gluing a baby onto the surface. The picture can be placed on wood, skin, fabric, rock, or just about anything else.
Decoupage decoupage is the same process, but it has only one feature - the picture is glued to the material. This can only be done on clear surfaces: hard and plastic. I understand that the picture in this way will be pasted on the mountain.

See you home! If a plate is used for direct decoupage, then it loses its decorative function. And with the use of the turning technique, the dishes can be used in the emergency mode.
Tools and materials for robots
| Materials and tools | Note |
| Using this additional technique you can decorate a book, dishes, flower pots, bowls, furniture. Zagalom, literally everything that is in your booth. |
| Pictures can be used for special decoupage cards and servets. In addition, for whom the mistress vicorizes little fabrics, old newspapers, and stamps from magazines. |
| You can use original manicure scissors or a special tool that is sold in handicraft stores. Golovne, so that the edges of the forest were even more beautiful. Only then will you be able to carefully edit the required image onto thin servette. |
| Required flat soft brushes. Their pile may be heavily fixed. Loss of lint can become a serious problem. More beautifully, a splint of pencils of different widths is used for smoothing and applying glue and varnish. |
| The most beautiful thing is vikorystuvati zvichayny pobutoviy PVA. You can buy a specialized warehouse, but it’s more expensive. Varnishes are better than acrylic ones. Vіn does not see toxic speeches and simple ones in the robot. |
| To decorate the work, you can use acrylic-based fabric, sponges, primer, sandpaper, craquelure. |


Basics
You can secure the little ones on the surface in a variety of ways, let’s take a look at them:
First method
A simple technique for decoupage from servers is laid on an object and secured with glue. After drying, the surface is coated with varnish.

Another method
For the gateway decoupage, you need to create a basis for the vision. The image is glued with the front side up to the fold. After drying, seal with varnish.

Method three
Artistic composition. For preparation, a faceless image is created, which, when glued, joins together. To make the picture look like one whole, the painting, shades and accents are added.

Method four
This technique is called “decopatch”. For her, pictures from magazines and little babies on fabric are created. To avoid clean edges, shave off the edges of the paper babies. The surface will be completely filled with images.

Fifth method
Creation of a volumetric image. This is a technique that requires the talent of an artist. The images from the paper server are first pasted on. And then, in a new way, work on painting with careful marking of all other details.
Decoupage dances for cobs: one piece with photos and recommendations
- The simplest and most accessible material from which you can make an original gift. You can buy a dance with wine or fill your stomach with a drink of rich wine. Exquisitely decorated to cope with hostility in any case.

We have already overpriced the materials and tools necessary for the work, so we won’t complain about anyone. The only thing that needs to be added to the list is a squeegee. First of all, remove the label-cleaned dough.
Important! Handle the glass vessel better with mittens. Your fingertips are unlikely to have any artistic value, so it’s better not to deprive them.
Sequence of decoupage dances for cobs, one by one with photo:
| Illustration | Description of the stage |
Apply primer 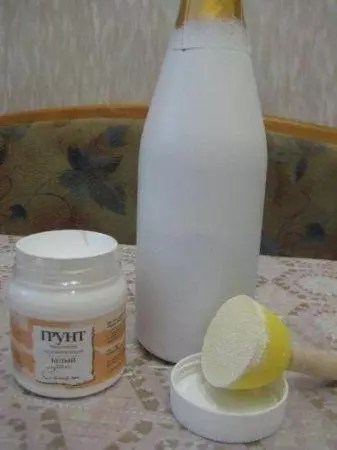 | For priming, you can use acrylic varnish or PVA. The soil is guilty of drying out. |
Robimo tlo 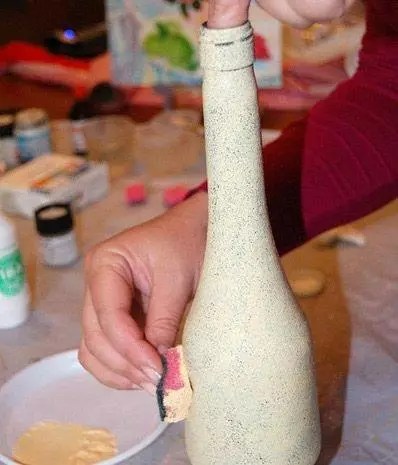 | As a background you need to use white or light acrylic. It is possible that you will have to apply two or three balls so that the surface becomes completely opaque. |
Applicable image  | The baby on the servet is carefully cut with scissors. If the background of the baby and the dance is avoided, go without a knife and carefully tear off the server card. To make it easier to apply the baby onto the surface, soak it in a bowl of water. |
We secure the little ones  | You need to apply varnish on the surface of the baby. This can be done with a soft flat pencil or a spray bottle. Slide the stitch so that the picture does not become covered with folds. It is necessary to straighten it carefully with a pencil. |
Finishing improvements  | After completely drying, you can carefully sand the remaining parts of the robot. To enhance the details, use a vikorist brush and dark paint. After completing the processing, apply the final ball of varnish. |
Another option for original design is decoupage of the dance with tights. Master class on video:
How to do some tricky decoupage on a glass for cobs: recommendations with photos of the baby and serverets
The first confirmation of gluing the servette may not be far away: wrinkles and folds will inevitably appear, which indicate the whole result. I'm glad to see how unique it is:
- Just apply the paint on the surface of the dome, you can apply it on any vitachki. Cut the edges of the baby with scissors or sew out the knitted stitches. The remaining option is to be careful and avoid the risk of sealing the image if the cut is not properly prepared.

- You can apply glue to the surface, and then add little ones and straighten them with a pencil. Another method that will not be too harsh is to apply glue on top of the baby, immediately straightening it.
- If the image is applied on a flat surface, you can pour glue into the center, apply a serving tray and carefully spread out the material, spreading the material over the surface.
- On a perfectly flat sheet, you can glue images using a guide for gluing.
- You can apply the baby with an additional piece of polyethylene (package or stationery file). Place the baby, face down, on polyethylene and soak with water. Then the bag with wet silverware is applied to the surface so that it is glued. The package is removed, the server is lost.

Simple master class decoupage boxes from the front
The smooth surface of a cardboard box looks puffy - a wonderful basis for decoration. This interior box will become a favorite place for pets.
| Illustration | Description of the stage |
Surface preparation  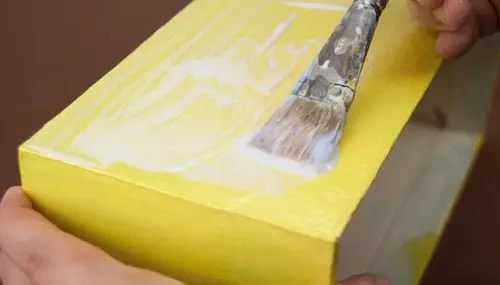 | The sides of the box need to be marked with a strip of painter's adhesive strip, then the surface should be primed with acrylic primer or porcelain. After drying, the primer needs to be lightly treated with sandpaper. It may be necessary to repeat the procedure if the ball does not lie smoothly enough. After this you need to decorate the box, select a color for the background. |
Inflicted baby 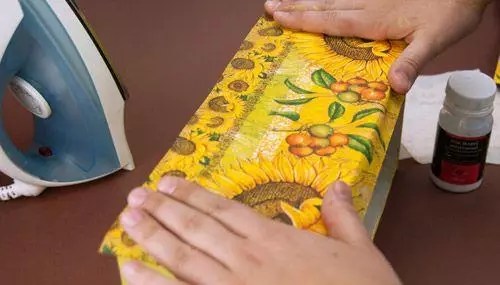 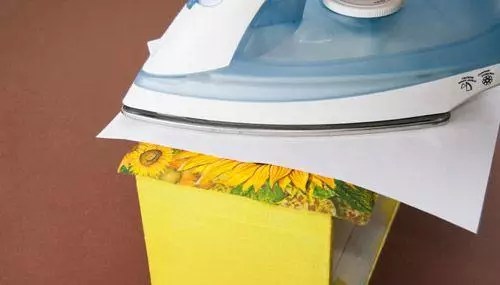 | The place for the baby is covered with decoupage glue. After completely drying the ball, the animal is covered with a baby and smoothed with hot sand through a paper bottle. Afterwards, the servettes are covered with a thin ball of varnish. The ball has become too hot to the point that the little ones are covered in pukhiri. This procedure is repeated over the entire surface of the box. |
Decoration and additional cleaning   | Using a foam sponge, apply the background color and other colors to match the image. Other details are marked with a pencil. To give it some extra shine, you can brush the animal with white farbe using the bristles of a toothbrush. After this the final varnish coating is applied. |
Decoupage of furniture in Provence style: Master Class chest of drawers renovation
Having tried your hand at simple speeches, you can safely proceed to decoupage with your own hands using servettes. In addition to the basic list of working materials, wood putty will be required. It is used to first repair any chinks, cracks and other imperfections on the surface of the chest of drawers, cleaned with old paint.
Sequence of decoupage of kitchen furniture with your own hands, photo and description:
| Image | Description of the operation |
Preparation  | Furniture must be carefully cleaned to remove dry balls and defects must be repaired with putty. After drying and sanding, all surfaces are coated with a primer and rubbed with sandpaper. |
Preparing pictures  | The little ones on the servettes are carefully removed, cut off with your hands, and the bottom ball is removed. The picture is coated with glue and applied to the furniture. The application is carefully straightened with a pencil. |
Finishing coating  | There is no need to hurry. All the little ones have to dry out. It is necessary to varnish all the furniture, not to detract from the decor. In large squares it is easy to use a spray bottle or spray can. So lay the varnish in a thin ball. For the best effect, you need to apply 3-4 balls in succession, allowing them to dry completely between the layers. |
 | Result. |
Corisna is pleased! If it is necessary to apply paint onto a polished surface, sand the polished surface first until it is extremely shiny.
When decoupling furniture with fabric, the process is practically identical to that described.

Meister class decoupage on video
As it seems, it’s better to drink once, than a hundred – almost. In addition, we present a selection of video lessons on decoupage for beginners.
Decoupage (pasting plates, jars and other utensils with cutlery) is clearly a new activity in the world of daily handicrafts. The modern technology is not very complicated, but requires respect, accuracy and diligence, a tip for beginners.
This method of decoration originated in the 17th century in England and is still popular. To learn how to work with original items, it sometimes takes a lot of time. For beginners, decoupage from serverets can be learned step by step, working with photographs, which will show the process step by step.
What is decoupage from serverets?
Decoupage is a technique for decorating speeches by sticking on them verses from the paper of the little ones., consistent with the artistic idea of the master and the further lacquer of the finished work for protection from damage. Vikonana's picture will be similar to the one on the right.
For an additional price, the technique of giving life to old pieces of furniture or household equipment creates miracles with which you can decorate your interior or give as gifts to friends and family.
Tools and materials for robots
To work with simple technology, you need the following equipment:
This is a standard dial. It is important to supplement the working material with improvised methods.
Basic steps and stages of decoupage of various objects
For beginners to master the technique of decoupage, and those who want to learn the technique of making bread, fakhivs recommend starting to work with servers for photographs.
Sequence of preparation on a wooden object:
- Sand the surface with an emery paper to allow the primer to bleed through.
- Prime it and then sand it again.
- Apply acrylic enamel to the animal.
- Overlay the image, cover it with balls of varnish, and clean the leather for gloss.
To understand how the materials interact, it is necessary to conduct a test on a similar sample. The peculiarity of the technique lies not in the clever detailing, but in the filigree and filigree, because... the task will have to be done with scissors. It’s better to use special pictures for decoration that have optimal strength, water resistance and Farbi glue. 
The stagnant servers require you to pick up the two bottom white paper balls, and take the cards into the robot immediately.
Learn the following techniques for attaching illustrations:
- Glue- The most advanced method. To do this, place the serverette on the object that is being decorated, and apply glue to the animal with a pencil.
- For more help with the file- Suitable for textured bases. On the clerical file, place the preparations for the dishes before pouring and sprinkling with water until the serving dish is completely wet. After distributing excess paper on cellophane, you will lose the product from the images. Apply spit to the item to be decorated, incl. Let the picture stick until now.
- with sand- Hot method suitable for smooth surfaces. Coat the working maidan with glue and let it dry. Rinse the little animals and cover them with parchment for baking. Smooth the paper over the paper with sand until the paper sticks. Apply varnish to the ball.
- Made from congealed gelatin. Repeat the gluing technique, only the glue is replaced with gelatin. Suitable for decorating Easter eggs. I to that 1 tsp. Dissolve gelatin in 1 tbsp. Sprinkle and vikorist like glue.
Creation of a viewer from servets
For decoupage, use the following materials:
- servets;
- special cards that are sold in art stores;
- little ones with measurements and razdrukovanny photographs;
- Images from paper, stamps from magazines, leaflets.
You can glue any pictures, but not all of them fit perfectly and it will take a long time to choose.
Set the following parameters:
- The main criterion is the size of the image, which must be in harmony with the size of the workpiece. Having mastered the technique of processing layouts, you can easily change the format of images in various graphic editors.
- Another factor is that the output material does not match the color palette. The combination of baby colors and decor, which is lost, is a significant part of the success that lies behind the help of a graphics program.
- Sometimes illustrations do not follow the image and style. The wrong choice of motive will result in a negative effect in the work. It is necessary to select pictures based on the idea that the wine is coming.
- There are also unneeded items on serverets that need to be cleaned up.
An ideal illustration for decoupage looks like this:

Technique for creating textured vaserunks
For voluminous decoupage, it is recommended to prepare a bunch of balls of rosettes from serverets. Then they need to be glued together spherically and attached to the base with additional silicone, which gives a trivial effect. This technique has 3 zones: the front part and the zones of the intermediate balls. Before gluing the elements, it is important to formulate the component with a natural one.
The creation of believable sculpture is an important mind. After the painting has been completely molded, apply varnish on a water-based surface using a cutter. These plots display light highlights and are visually larger.
Dance decoration technique
Decoupage dances from servets for cobs to rob one by one from the photo. For which it would be better to take a glass that is smooth and without any bulges. For the job, you will need a standard set of tools with the addition of a squeegee, which will then be used to clean the sticker patch. Wear gloves carefully so as not to damage your fingers. 
Sequence of Viconn:
- prime with varnish and PVA glue, let dry;
- We create a background with light acrylic paint around a bunch of balls, to the utmost clarity.
- cut the babies with scissors. To avoid damaging the capacity, simply wrap the ends of the server;
- soak the image with water and seal it;
- Apply varnish on the top of the motif with soft penzlik or rozpilyuvac;
- carefully straighten the folds with a tampon;
- Upon completion, it is necessary to polish up other damages;
- Once the residual hardening has been reduced, coat it with varnish.
Decoupage of dances with your own hands: master class
To achieve the bright decor of a glass dance, you need to know a number of important nuances. Create a garniy decoupage of a sacred dance or leather. Such a look can decorate any room, for example, a kitchen. 
Master class:
- At the first stage, prepare all the necessary materials before work. The head material is a piece of cake. It can be of any shape. However, it is clear that decoupage of a glass jar looks much more effective.
- In preparation for gluing, the material may be cut. The servettes are squeezed from the beginning and cut with scissors. However, you don’t have to use the cutouts, the work will be beautiful if the serverettes are glued to the container in a chaotic order.
- As an option, the robot can use complete paper paper, rather than stitching.
- The method of attaching the servers must be thought out by the master in advance. The simplest option is to glue them with tape.
- The top of the container needs to be prepared. It’s important to make sure it’s clean and dry. To remove any unevenness, lie on the surface of the jar and sand it down. You can fry a jar for the eggplants.
- It is necessary to protect the work area from congestion. For example, you can cover it with newspapers.
- Next, take the glue and mix it with water. To remove the sticky mixture, mix the water and glue in a small bowl.
- Then the prepared adhesive paste must be applied to the surface of the serverets and all paper surfaces that are used for decoration. While the sumish has not dried on the paper surface, stick the trace onto the top of the jar.
- It is important to coat the edges of the visages well. To make the composition look more beautiful and more effective, glue the server on 2 balls.
- Before you suddenly glue the jar, you need to ensure that the first ball is completely dried out.
- To secure the work, you need to apply can varnish to the surface.
- After the varnish has dried, you need to wipe the top of the jar with a soft plaster, and then seal it again.
List:
- Another ball of servettes needs to be glued after the first ball is dry.
- It is important to roll over, so that the little ones over-arm are deprived of servets on one side. Why? On the right, after glue is applied to it, the server can wrap the little ones onto another side.
- You need to make sure the glue is completely dry. Before you empty the jar, you need to try to remove the scraper from the serving cutter. If it is easy to bend and tear, you will need to re-apply the glue.
- Sometimes the serveries are poorly attached to the glass surface, as the glue is not prepared properly. It is important to adjust the proportions and mix the glue and water to the required extent. You can also add ready-made glue for decoupage, however, this is not the first glue.
- The master is guilty of trimating the gancher under the hand of the Volog. With this help you can easily remove excess glue.
- If you glue the servers into a bunch of balls, you can achieve a rich 3D effect. Before applying the offensive ball, the front one needs to be sealed.
What do you need to prepare before this decoupage?
If you don’t plan to make handicrafts using this technique: work on the dances of growth, create a decoupage turn, decorate dishes, you will need to “get ready” with the necessary tools and materials. 
Oh my god, I need it:
- Containers, the decor of which varies.
- Glue. Most often, the glue needs to be mixed with water, or stores sell special adhesive for decoupage.
- Knives. They can also be used to cut elements for decoration, such as paper or stitches.
- Varnish. You can replace the varnish with drying oil.
- Decorative elements, such as materials for decoupage.
How to remove growths from the curse dance?
The creation of volumetric elements with this technology is not uncommon. There are endless ways to create growth in a glass container. The best way is to glue polymer clay onto it. Every element of such clay appears on the dance, whatever the master wants.
You can make anything you like from polymer clay, animals, sea anchors, or just round balls. 
Instructions:
- A glass container and polymer clay are being prepared for softening.
- Master to work with your own hands those growths that you want to dance.
- The clay is then combined with a special resin that softens its structure.
- After this growth can be attached to the top of the jar, gluing them with “Moment”.
- The material was baked in the oven. The temperature is no lower than 130 degrees.
Porada: To create voluminous holes, you can use putty quickly. It forms the outline of the required figure, after which the figure is filled.
Decoupage of dances: Pokrov's instructions
The robot scheme is described step by step:

Yak zrobiti garniy korok for dance?
To give the composition a complete look, you need to think about how the cork stopper will look. The cork is beautifully designed to give the composition a logical conclusion. The simplest option is to glue the corks with knitting yarn. Bazhano, it should be the same color as the little one on the servet. It is also important that the yarn is bright and dirty. 
There is no sense in using thin acrylic thread for scrapings, so the fragments are practically undetectable.
You can also glue a decorative ball, such as a sunflower, onto the surface of a dance cap decorated with thread. Don’t forget about the ability to decorate a composition using acrylic frames. The master can depict on the top of the jar a little baby, for example a chamomile or a sun.
Options for the final design of the robot
Let's take a look at the design of the decorated side dance:
- Take halves of nastin in the tone of the main color of the container and glue them with hot glue on the edge to enhance the unusual shape of the container.
- A living bow is tied to the stick of the barled glass and neck.
- We glue small leaves and flowers onto the bow.
- To finish, apply glue to the edges of the patch and apply golden sand (solidify spray or powder) to add shine and thickness.
Scrape around the edge of the hole. To make it smooth, you need to glue a paint adhesive strip and then spread it with gum glue. Then put away the tape and carefully apply the glue with your hands after the farbe has dried. It is important to place the paper on the paper until there is a line for neat drawing of the rice.
Master class decoupage boxes
For decoupage, a cardboard box with a smooth surface is suitable. 
Pokrokovo technique:
- Secure the pieces of paper box with some masking tape, and then prime the entire working area with acrylic.
- Let it dry and sand the primer with fine sandpaper.
- If the coating was not right, perform the manipulation again.
- Then select the color you choose for the background.
- Apply decoupage glue to the illustration area.
- After drying the animal thoroughly, lay the baby on the baby and smooth it with hot powder, placing a paper on the top.
- Cover the image with a thin ball on top of the virobu.
- Using a foam sponge, apply the background bar and other tones that match the color palette.
- Use a pen to paint over other elements.
- To avoid any sloppiness, fakivts should use a toothbrush to squirt the animal white farb.
- Finish with varnish.
Decoration of the plate
Decoupage of plates can be done in decorative ways, so that it is easier for cobs to master the mysticism of serving vegetables, illustrated with photos.
There are two ways to decorate tableware:
- The direct motif is applied to the front side.
- Gateway – the image is superimposed on the gateway part of the design.
For decoration, a smooth white plate, prepared with portions and without small parts, is suitable.
 Decoupage for corn cobs with photos from serverets requires the use of special devices.
 Robot order:
- Virize the servet viewer.
- Degrease the work item on both sides with a cotton swab soaked in alcohol.
- Wipe dry to prevent any bumps or creases from appearing during the process.
- Carefully place the pattern on the front of the dish.
- Apply glue to the top and smooth out the elements with a pen.
- Let the glue dry and seal the surface.
For vykoristannya plates for everyday needs, it is more beautiful than visconati gate decoration.
The technique of visualization is similar to that of guidance, but has some special features:
- The illustration is attached to the back of the tableware, which may be visible for the work.
- Glue is applied only to the edge of the motif, which will prevent the front part of the dish from sticking out.
- Cover the image with acrylic barnacle and dry it.
Decorate for style
For beginners, you can create decoupage of the stilt from servings, it is important to take the straight stilt without the big details and complete the steps step by step, in short with the photo.
- Preparation for processing, which includes cleaning, removal of old meat or varnish and defatting.

- Mix the primer into balls and dry it naturally.

- Prepare the stelets, applying the main substance. Warm it until the servettes are visible, and if necessary, the crème fraîche will be ruined.

- It’s important to think carefully about how you want the image to look and begin to visualize the image.

- Rotate and glue pictures. As you progress, you can customize the motif, add color with markers and felt-tip pens, and apply glitter.
- Apply varnish to 2-3 balls. Let it dry up.
Decoupage on wood
Trees, ready to work, prepared in various shapes and are available for sale. If I have an idea to decorate a homemade item that I will have to make on my own.
Wood surfaces are divided into 3 groups:
- The workpiece is not cut. Due to the obvious shortness of hair, it should be sanded with fine sandpaper. The grooves should be filled with putty or a special primer. Dry and sand again with an emery paper. Then prime with white acrylic barnacle.
- Z leaked, how to sand the motif from the virus for a better finish. Then wiped off the saw and applied primer.
- Pofarbovany Maidanchik, which will require a first look. If the mixture is not cured, then it should be sanded with fine-grained emery. When the coating is sanded, the old Farby ball is removed using a grinding device or a special grinder. Clean the roughened surface, prime it and sand it.
Robot order:
- The working platform must be sanded and primed. To create the antiquity effect, apply 3 balls of whitewash to the workpiece, allowing the skin to dry. Then use sandpaper or a metal scraper to clean out the defects.
- If the spots seen by bugs are sharpened, treat them with a brush tip, put on a drill and cover them with stain.
- Take the little ones from the top of the serving bowl.
- Place the motifs in preparation and carefully cover the animal with glue and dry. When finished, coat and let dry.
Decoration of the finished board
Vikonannya decor pokrokovo:

Self-creation of original wall design
The main idea behind the creation of such decoupage lies in the transfer or movement of pasted images on flat or other surfaces, for example, walls, underlays, racks or hanging the doors of a wardrobe. The images are filled with paper appliqués, which appear in the future, decorated with crackle and additional paint, which gives them a sense of urgency and realism.
Correct decoupage on the walls will definitely bring originality to any space.
Preparing images that are drawn from ready-made templates does not take much time. However, if you are not satisfied with your designer features, it is best to choose flowers and natural flowers that will add “viboglivi”. 
Materials and tools for creating wall decoupage:
- Emulsion/acrylic paint is intended for walls and fits into the interior.
- Primary olive.
- Virizans from paper vizerunki.
- Trellis/PVA glue.
- Razor/knives.
- Pokrittya primer.
- Acrylic varnish.
- Rhubarb.
In addition, the fabric is placed under the hand on a hard surface, which can be used as a lining during the carving of ornaments, and the tone of the farbee should not deviate from the outer style of the placement.
Instructions for creating wall decoupage
First of all, you should start working like this and get acquainted with the technique of different, traditional decoupage: Watch the video tutorials or just take a look at the peculiarities of the process in general.
After understanding the following, try this in practice:
- Clean the surface of the walls of the varnish with an emery paper, then prime and coat with waterproof or acrylic paste, in 2-3 balls, and let it dry.
- While the wall is drying, you can cut out the templates from trellises or special servets.
- Along the already dry wall, the center and extreme points of the future composition are outlined.
- After this stage, the gluing itself begins, carefully select its own place for the skin fragment, spread it with glue on the back side and apply it to the wall, gently pressing it with a soft piece of fabric.
- On the sides of the composition, or on the white windows and doors, the ornaments appear more roundly.
- After the skin reaction, you can try to evaluate the work from afar, since it is impossible to see the correct scale of the work up close.
After sticking the main little ones, you need to move on to other details. It’s important, of course, to work out all the templates at once, right from the beginning. Also, every time we cannot forget that the composition must comply with the idea and it must be verified from time to time.
When the application is dry and all parts need to be trimmed, apply the composition step by step with acrylic varnish in 2-3 balls. After the remaining time to dry, the decoupage is ready. As long as you follow all the rules of the economy, this technique can transform your space into a better place.
Technique for smoothing out the smoothing
It is recommended to glue the servettes using the pasting method using a special warehouse. Apply the resin to the surface, paint it, smooth it, and let it dry a little. Then apply the embossed paper and a sheet of paper, and rub a little bit of the decorative surface with lightly hot sand. Quilt so that the creases do not form and the motif is secured. 
It uses a special water-based adhesive to replace glue.. It's resistant to sunshine, vologs, if you don't want to eat it.
To prevent any wrinkles from appearing, cover the surface with glue, place the serving on top, carefully smoothing it out with your fingers or a pencil. Apply paper appliqué onto a dry decorative item and cover the area to be glued with the ball.
Secrets from the Masters
Decoupage for corn cobs with photos from serverets can be learned step by step for beginners.
Subtleties that cobs need to know:
- The surface of the skin (behind the ridge) is sanded with emery material and softened. The plastic will require a lot of manipulation to remove the hairiness and shortness from the coating. The wood is stripped of the fibers to make it smooth. Metal objects are polished to remove the front surface or surface. It is difficult to remove alcohol or acetone.
- Lightly prime the working area before frying with balls of white eggplant. Since the material is porous, acrylic lays unevenly.
- We recommend that people who start working decoupage use small pieces. To stretch the images uniformly, gluing them, begin by running the pencil from the middle to the edge, at which point you should carefully pick up any loose bulbs that appear.
- Crinkle and crease the folds carefully and carefully. If your product is free of defects, you need to fix it with layers of varnish. The bigger you are, the better your appearance.
- In order for the working tool to serve for a long time after completion of work, it is necessary to wash and clean it. To do this, place a container of water and immediately lower the vicor brushes and washcloths into it.
- Before applying the skin, and also after gluing the ornament, you need to dry it thoroughly, and the next stage of development will begin on dry ground.
Don't be afraid to experiment!
It’s really easy to learn how to make decoupage using serverets. For newbies, it’s best to check out the basic material with a side photo. Having mastered this mysticism, they create unique masterpieces that delight the lost with their beauty.
Decoupage of jars, dances, interior items and hanging on the walls in the living room is a very tedious task, which you can get away with in any way possible. Golovne - you want to create a unique and beautiful river and get some great ideas!
Video: decoupage for corn cobs with photos from servers
The simplest decoupage for beginners, watch the master class in the video clip:
Learn how to glue a server using the decoupage technique in the video: